Expanding your home in Canada is less a matter of budget than a strategic anticipation of regulatory, financial, and family roadblocks.
- Municipal regulations, far beyond simple zoning, represent the first potential obstacle to a project.
- A 15% financial contingency is not an option, but a calculated necessity to absorb the unforeseen issues inherent in existing buildings.
- The success of a construction project in an occupied environment depends on a clear protocol that safeguards family life.
Recommendation: Treat every constraint not as an obstacle, but as a creative design opportunity to enhance your property and your quality of life.
For a growing family, the equation is often complex. You love your neighborhood, your children have their friends nearby, but the walls seem to be closing in. The reflex is to look at the real estate market, which is often saturated and discouraging. However, the solution may already be right before your eyes: your own property. Adding a room, a floor, or transforming wasted space seems to be the ideal answer to gain living space without uprooting your daily life.
Faced with such a project, the usual advice flows: “make plans,” “find a good contractor,” “think about aesthetics.” While these basics are sound, they mask a more complex reality that families often discover too late. The success of an extension does not rest on simple technical execution, but on mastering dynamics that are often invisible at first glance.
But what if the real key wasn’t just in the quality of the plans, but in the surgical anticipation of breaking points? The true challenge is to successfully navigate between three major pitfalls: the municipal regulatory wall, the financial slip of unforeseen events, and the chaos of a construction site at the heart of family life. The goal is not to suffer through these constraints, but to transform them into a creative set of specifications.
This article is not just a simple to-do list. It is a strategic roadmap, designed by an architectural technologist, to help you bypass traps and make your expansion project not only a technical success but also an architectural asset and a gain in sustainable quality of life. We will cover regulatory, financial, structural, and human aspects so that your dream of more space does not turn into a logistical nightmare.
To guide you through the crucial stages of your project, this article is structured around the fundamental questions every homeowner should ask. The table of contents below will allow you to navigate directly to the points that concern you most.
Summary: Complete Guide to Residential Expansion in Canada
- Why your city might refuse your extension project even before the first plan?
- Adding a floor or expanding to the side: which option is less expensive per square foot?
- Garage converted into a living room: how to insulate the cold concrete slab to make the room comfortable?
- The mistake of creating an extension that looks like an architectural “wart” on the existing house
- How to survive an extension project while living in the house with children?
- The mistake of not planning for a 15% contingency that stalls the project halfway through
- Open concept or closed rooms: which configuration better enhances an 80s house?
- How to structure your renovation project to avoid 6-month delays and cost overruns?
Why your city might refuse your extension project even before the first plan?
Even before dreaming about the layout of your future room, the first—and often most formidable—interlocutor is your municipality. Many homeowners mistakenly believe that complying with building codes is enough. This is a fundamental error. The true arbiter of your project is the zoning bylaw and, in an increasing number of Canadian cities, the Architectural Integration and Implementation Plan (PIIA). These documents dictate rules that are far more restrictive than the Building Code.
A refusal can occur for reasons you might never have suspected. A lateral setback of a few centimeters not respected, a ground coverage percentage that exceeds the maximum authorized, or even an “invisible” servitude from Hydro-Québec or Bell that crosses your land exactly where you planned the excavation. These constraints are non-negotiable and can stop a project in its tracks. Furthermore, urban planning committees often have discretionary power over the aesthetic aspect, allowing them to refuse a project deemed unharmonious with the neighborhood’s character, even if it is technically compliant.
The only viable strategy is proactivity. A municipal pre-validation process, before incurring architect fees, is indispensable. This involves obtaining the location certificate, studying specific regulations, and, above all, making an appointment with an inspector from the urban planning department. This meeting will allow you to present a draft and identify potential blocking points. It is a step that seems administrative, but it is actually the most critical foundation of your project.
Adding a floor or expanding to the side: which option is less expensive per square foot?
When the decision to expand is made, the question of direction arises: upwards or to the side? This choice is not just aesthetic; it has major financial and structural implications. Intuitively, one might think that expanding to the side is simpler. However, in terms of gross cost per square foot, adding a floor is often more economical because it does not require new foundations or excavation, which are very high-cost items.
Canadian market data illustrates this difference well. According to a construction cost analysis, you should budget around $145 to $175 per square foot for a story addition. In comparison, a lateral extension with a new basement can quickly climb higher. However, the cost per square foot is not the only factor. Adding a floor (vertical expansion) requires a rigorous structural evaluation of the existing foundations and framing. If your house was not designed to support additional weight, reinforcement costs could cancel out the initial savings.
Lateral expansion, on the other hand, preserves the integrity of the existing house during much of the work, but its major drawback is reducing your outdoor space. For families with children who cherish their backyard, this is a significant sacrifice. The choice therefore depends on a trade-off between cost, the structure of your house, and the value you place on your land.

This visualization highlights the dilemma: vertical expansion preserves the land at the cost of heavy structural intervention, while horizontal expansion consumes outdoor space for potentially less intrusive construction. The final decision must integrate both dimensions to align with your family’s priorities.
Garage converted into a living room: how to insulate the cold concrete slab to make the room comfortable?
Transforming a garage into a living space is an attractive solution for gaining space at a lower cost. However, a major trap awaits homeowners: the concrete slab. If left uninsulated, it acts as a giant thermal bridge, sucking the heat out of the room in winter and making it uncomfortable, damp, and energy-intensive. Making this space truly habitable requires a rigorous technical approach, far beyond simply laying a floating floor.
The secret lies in creating a complete thermal and moisture barrier. The most common mistake is underestimating the importance of the vapor barrier. Without a perfectly sealed polyethylene membrane under the insulation, moisture rising from the ground will condense and create mold problems. The insulation itself must be a rigid material, such as extruded polystyrene (XPS), with an R-value (thermal resistance) adapted to your province’s standards. In Quebec, for example, R-10 is a minimum for a slab.
Once the insulation is laid, a new support for the floor covering must be created, either via a floating floor (raised subfloor) or by pouring a new lightweight concrete topping. This intervention is also an opportunity to think about the ultimate comfort: installing a radiant floor heating system. Finally, it is crucial not to neglect air quality. Health Canada strongly recommends performing a radon test—a carcinogenic gas that can seep through concrete slabs—before finalizing the layout. Properly insulating a slab is not an expense; it is the investment that transforms a cold garage into a truly comfortable living room.
Action Plan: Validating your concrete slab insulation
- Install a vapor barrier membrane: Lay and seal a polyethylene membrane directly on the existing concrete slab to block any moisture rise.
- Lay rigid insulation: Install XPS-type rigid insulation panels with the minimum R-value required by your province’s code.
- Create a new floor: Build a floating floor over the insulation or pour a new concrete screed to obtain a stable and level surface.
- Perform a radon test: Before closing the floor, conduct a radon test, as recommended by Health Canada, to guarantee indoor air safety.
- Integrate heating: Choose and install a suitable heating system, prioritizing a heated floor for optimal comfort, or an efficient wall-mounted heat pump.
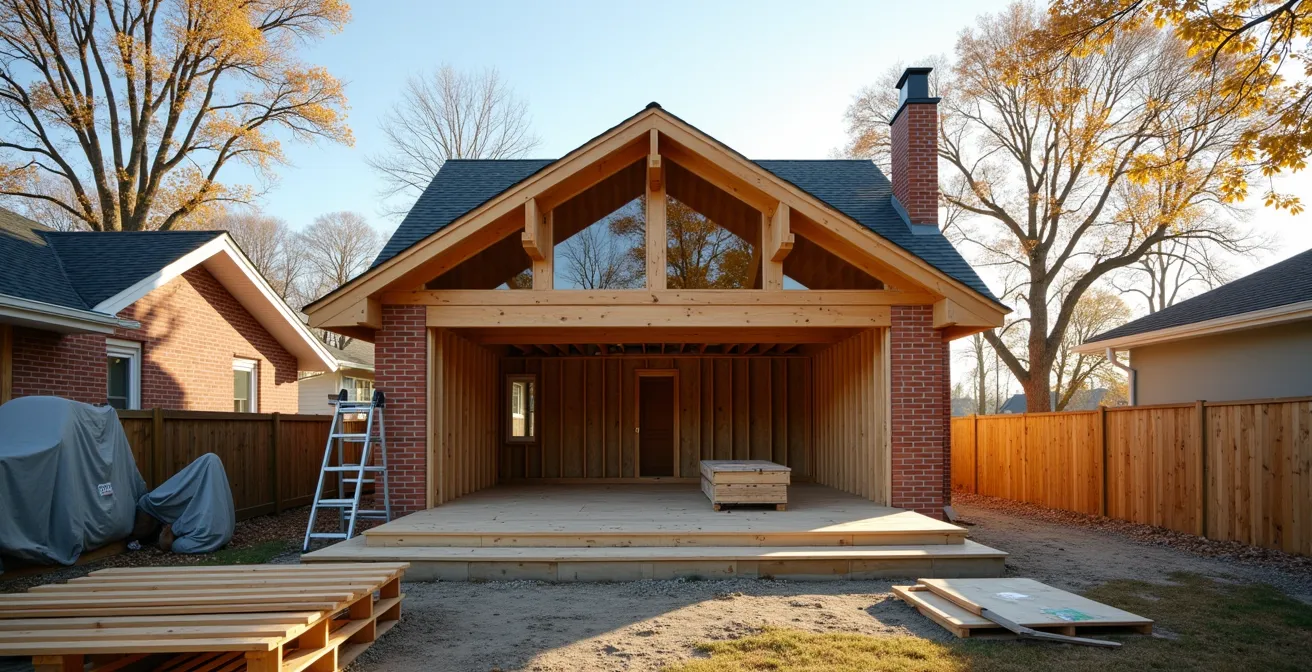
The mistake of creating an extension that looks like an architectural “wart” on the existing house
An extension should not be built simply to enlarge the house; this construction must have a specific objective in terms of layout.
– Expansion Expert, House Expansion Guide
One of the most costly mistakes, not in dollars but in real estate value and daily enjoyment, is designing an extension in a vacuum. The result is often a clumsy protrusion, a “wart” that looks like it was added as an afterthought, without regard for the original building. This purely functional approach (“I need one more bedroom”) destroys the coherence and appeal of the property. A successful expansion is not an addition, but a transformation that engages in an architectural dialogue between the old and the new.
This dialogue can take several forms. It can be stylistic continuity, where the same materials, roof slopes, and window types are used so the addition blends into the existing structure. But it can also be an intentional contrast, where a modern, sleek extension wakes up and highlights a more traditional house. In both cases, the key is intent and managing transitions. Junctions, window alignments, and ceiling heights are the details that make the difference between a successful graft and an architectural scar.
The objective must go beyond simply creating square footage. The extension should improve the house as a whole: correcting a circulation flaw, bringing light into a dark area of the old part, or creating a new connection with the garden. By thinking of the expansion as a lever to rethink the entire house, you create true added value.
Case Study: Transformation of a house on the South Shore of Montreal
A project on the South Shore perfectly illustrates this principle. Faced with a dated house with an inefficient turret, the owners opted for a modern extension. Rather than simply “sticking” on a cube, the architects removed the turret, created a contemporary canopy, and used steel beams to open up the space. The result is a perfect junction between the existing and the new, where the extension modernizes and enhances the entire structure, offering a house with functional extra spaces and renewed architectural character.
How to survive an extension project while living in the house with children?
The prospect of a construction site at home is stressful for everyone, but for a family with children, it can turn into a nightmare. Constant dust, noise, the coming and going of strangers, and the loss of vital space can put nerves to the test. Surviving, and even living well during this period, is not a matter of luck but of near-military organization and flawless communication with the contractor. The key is to move from a logic of “enduring the site” to a logic of “managing the cohabitation.”
The fundamental concept is that of the “sanctuary clean zone.” This involves delineating a part of the house that will remain absolutely untouchable, clean, and functional, no matter what happens. This zone must be physically separated from the construction site, not by simple plastic sheeting, but by rigid temporary plywood partitions with a door. This is a psychological refuge for the whole family. This sanctuary must be contractually defined with the contractor, as well as strict working hours (for example, no noise before 8:00 AM, work ends at 5:00 PM) and a mandatory daily cleaning protocol.
For children, anticipation is essential. Create a weekly visual calendar that indicates the noisiest or dustiest phases (“Tuesday is jackhammer day!”) to prepare them mentally. Involve them safely by showing them the progress of the work from a distance. Finally, plan “escapes”: schedule weekends at the grandparents’ or outings to escape the war zone. These moments of respite are crucial for recharging batteries and maintaining a positive morale throughout the project.

The image of family life preserved in the middle of a construction site is not a utopia. It is the result of rigorous planning where physical barriers and clear rules create a bubble of normalcy, allowing children to continue playing and the family to function despite the work in the background.
The mistake of not planning for a 15% contingency that stalls the project halfway through
In the world of renovation, the initial budget is only an estimate. The most frequent and dramatic mistake is not budgeting a sufficient contingency margin. Many families ignore or minimize it to fit the project into their borrowing capacity. However, a contingency fund of 10 to 15% of the total cost of the work is not “lost” money or “just in case” money; it is an integral and active part of the budget, intended to cover unforeseen events that are, in reality, predictable.
Working on an existing structure, especially a house dating from before the 80s, is like opening a Pandora’s box. You might discover asbestos in old materials, non-compliant plumbing, a frame weakened by old water infiltration, or rubble foundations needing reinforcement. These discoveries are not exceptions; they are the norm. Without a contingency, such a discovery means an abrupt halt to the construction site while trying to find additional financing, which is often an uphill battle. This situation is even more critical because banks may refuse a loan if they estimate that the extra cost will not be recovered upon resale.
The contingency is not decided at random. It is calculated using a risk matrix. An experienced technologist or architect will evaluate the age of the house, the type of work (a story addition is riskier than a lateral extension), the season (winter work carries risks), and the general state of the structure to define a realistic percentage. Ignoring this calculation is betting that your house is the perfect exception—a bet very few homeowners win.
| Risk Factor | % Contingency to Add |
|---|---|
| House built before 1980 | +5% |
| Story addition project | +3% |
| Work planned during winter | +2% |
| Suspected presence of asbestos | +3% |
| Rubble or block foundations | +2% |
Open concept or closed rooms: which configuration better enhances an 80s house?
Houses from the 80s and 90s, with their succession of small partitioned rooms, are ideal candidates for reconfiguration. For decades, the trend has been total open concept: tearing down all walls to create a vast living space. While this concept remains attractive for its conviviality and brightness, the pandemic reshuffled the deck. Remote work, the need for privacy, and energy efficiency have challenged the “all-open” dogma. For a house of this era, the best valuation might no longer be in maximum openness, but in an intelligent hybrid configuration.
The challenge is to find the right balance between fluidity and functionality. Keeping a closed office, for example, has become a major asset on the real estate market. Similarly, a semi-open kitchen, delimited by a glass partition or a wide arch, allows for noise and odor containment while maintaining a visual connection with the living room. These semi-open solutions offer the best of both worlds.
Technically, opening a load-bearing wall is a delicate operation that requires the intervention of a structural engineer. The most common solution is the installation of an engineered wood (LVL) or steel beam to take over the load. The cost of such an intervention, including engineering plans and installation, can vary from $10,000 to $15,000 in Canada—a significant investment, but one that can radically transform the perception and value of the house. Rather than following a trend, the right strategy consists of analyzing your family’s traffic flows and designing a custom configuration that will meet your needs for years to come.
Key Takeaways
- Municipal validation is not a formality, but the first critical step that can determine the very viability of an expansion project.
- Successful architectural integration does not just copy the existing; it engages in a dialogue with it to create new aesthetic and functional value.
- The contingency budget (10-15%) is not an option, but an essential and calculated component of the budget, guaranteeing the continuation of work in the face of the unforeseen.
How to structure your renovation project to avoid 6-month delays and cost overruns?
An expansion project that drags on and a budget that explodes are the two greatest fears for homeowners. These slips are rarely the result of bad luck; they are most often the direct consequence of a lack of structure upstream. The key to respecting timelines and budgets lies in a detailed planning phase and in choosing the right project management model.
The non-negotiable starting point is the creation of complete and detailed plans by an architect or an architectural technologist. As experts point out, plans are necessary not only to obtain the municipal permit, but above all to allow contractors to bid on a clear and identical basis. Vague plans lead to vague bids, and therefore to unforeseen “extras” along the way. This design phase, which can take several weeks, is the most profitable investment of the entire project.
Next, the choice of the delivery model is crucial. The classic model separates design (architect) from execution (general contractor). It gives you more control but places you at the center of coordination. The Design-Build model entrusts the entire project to a single firm, from the first sketch to handing over the keys. This integrated approach can simplify communication and potentially reduce delays by optimizing the sequence of tasks. There is no one-size-fits-all solution; the choice depends on your desired level of involvement and the complexity of your project. A clear structure, precise plans, and a solid contract are your best assurances against delays and cost overruns.
To put these strategies into practice and launch your project on a solid foundation, the first concrete step is to commission a professional to perform a feasibility study and preliminary plans. This is the action that will transform your idea into a achievable project.
Frequently Asked Questions about home expansion in Canada
When should I call an architect in Canada?
As soon as the project modifies the building’s structure. In Quebec, for example, plans must be certified by the seal of the Ordre des technologues professionnels du Québec (OTPQ) or the Ordre des architectes du Québec (OAQ). In Ontario, a BCIN (Building Code Identification Number) certification is required.
How long does it take to get a permit in a large city?
Delays vary greatly, but it is prudent to plan for 3 to 4 months in cities like Montreal or Toronto. This period is necessary for the project’s analysis by various municipal departments, especially if it is subject to a PIIA (Architectural Integration and Implementation Plan).
What is the difference between the Classic and Design-Build models?
The classic model is sequential: you first hire an architect or technologist to create plans, then you launch a call for tenders to choose a general contractor. The Design-Build model is integrated: you entrust the entire project (design and construction) to one and the same firm, which can simplify communication and coordination.